You can manage parts on your Propeller to track supplier's stock as well as enable stock management in your internal silos. More can be found out about managing stock here.
The Parts Catalogue can be found by selecting Stock Management > Parts Catalogue.

_____________________________________________________________________________________________________________________________________
Add Parts

To add parts to the catalogue, select the green + button in the top right.
Here you can enter the part details. The following details are mandatory:
- Part Number - Code for the part. If you do not currently use part numbers these can be created for the upload (e.g. SOR "Boiler Service and Safety Check" could have the code "GAS01").
- Name - Name of the part, for example: “Boiler Service and Safety Check”.
- Service - The service area the parts will be available for (Common (All Services), Gas, Electrical, Oil, Sweep, Trade, Commercial Gas).
- Category - Created by the upload as your main categories, for example “Boiler Parts”.
- Supplier - If no suppliers have been created in the previous step, this will be “Unknown”, otherwise enter the name of the relevant supplier previous created in Manage Suppliers.
- Selling Price - The cost to the customer that you will invoice for.
- Allow Discount - Is the part allowed to be discounted (Yes/No).
- Allow FOC (Free of Charge) - Is the part allowed to be offered free of charge (Yes/No).
- Tax Code - Tax code of the item, the standard tax codes are: “S Standard( 20.00% )”, “R Reduced rate( 5.00% )”, “Z Zero rated( 0.00% )”.
You are able to paste part details from an external spreadsheet using Ctrl + C to copy and Ctrl + V to paste (Command + C/V on Mac).

Once you have entered the required part details, select Save Changes to add them to the catalogue. Alternatively, whilst creating parts you can select Reset any time to remove any details you have added.
_____________________________________________________________________________________________________________________________________
Edit Parts

To edit parts in your catalogue, select the green Edit button in the top right.
Here you can make changes to your saved parts. You can apply a filter to the Edit view if you would like to make changes to specific parts (more on filtering can be found below).
Changes can be made in a similar process to creating the parts. Select Reset if you would like to revert any changes made back to when you initially entered the Edit view.
Once the desired changes have been made, select Save Changes.
You can return to the initial Parts Catalogue page anytime by selecting the Catalogue icon. Please be advised that any changes made will not be saved.

_____________________________________________________________________________________________________________________________________
Filter Parts
You can filter parts using either the Search Bar or the Filter button. These methods can be used together.
The search bar can be used to filter by specific Part Numbers or Names.

By selecting the Filter button, you can filter by the following details:
- Part Number/Name
- Service
- Category/Subcategory
- Supplier
- Price (if greater/less than/equal to purchase/selling/promotion price)
- Tax Code/Cost Code
- Allow Discount (Yes/No/Not Applicable)
- Allow FOC (Yes/No/Not Applicable)
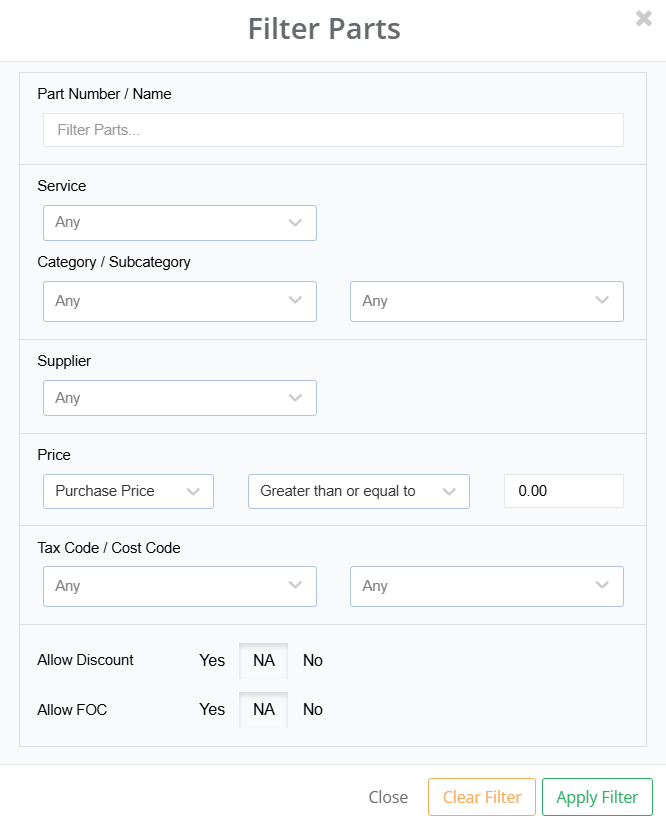
Select Apply Filter to filter the catalogue. Furthermore, you can select Clear Filter to remove the filter applied to the list.
_____________________________________________________________________________________________________________________________________
Delete Parts

To delete parts, select the green Edit button in the top right.
Apply any required filters. You can then select the part by clicking the corresponding number in the left column. Hold Shift to select multiple parts.
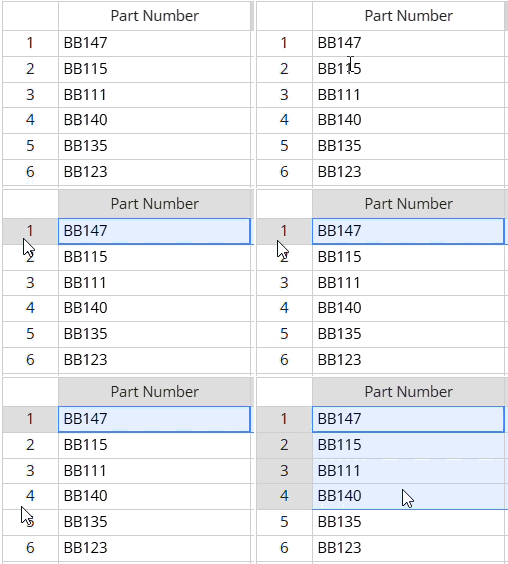
Once the desired parts have been selected, click Delete Selected.
When a part is deleted it is removed from the Parts Catalogue, however you can still find these on the system. Whilst in the Edit view, select the Show Deleted Parts checkbox to view any parts that have been deleted.

_____________________________________________________________________________________________________________________________________
Restore Parts
Whilst the Show Deleted Parts checkbox is selected, select the parts you would like to restore. Once this has been done, select the Restore Selected button. The parts will now be available as normal in the catalogue.

_____________________________________________________________________________________________________________________________________
Export Part List

You can export the Parts Catalogue according to if you have/what filters you have applied. To do this, select the Excel icon at the top.
Was this article helpful?
That’s Great!
Thank you for your feedback
Sorry! We couldn't be helpful
Thank you for your feedback
Feedback sent
We appreciate your effort and will try to fix the article