SORs are Schedule of Rates. These allow you to provide an estimate of costs and time that work may take to carry out, alongside details of the job and which skills are required to complete. To manage your SORs, navigate to Stock Management > SORS Catalogue.

_____________________________________________________________________________________________________________________________________
Create SORs

Whilst on the SORS Catalogue page, select the plus icon to the right of the page.
Here you can enter the SOR details.

SORs require the following details:
(Red fields are required, one or both Orange fields are required.)
- SOR Number - Code for the part - if you do not currently use part numbers these can be created for the upload (e.g. the SOR "Boiler Service and Safety Check" could have the code "GAS01").
- Name - Name of the part (e.g. "Boiler Service and Safety Check).
- Service - The service are the parts will be available for, these can be:
- Common (All Services)
- Gas
- Electrical
- Oil
- Trade
- Commercial Gas
- Category - Created by the upload as your main categories (e.g. "Boiler Parts").
- Subcategory - Created by the upload as your sub-categories (e.g. "Worcester Bosch").
- Supplier - If no suppliers have been created this will be "Unknown", otherwise enter the name of the relevant supplier. You can learn more about creating suppliers here.
- Purchase Price - The cost to your organisation for this part/SOR.
- Selling Price - The cost to the customer that you will invoice for.
- Tax Code - Tax code of the item, the standard tax codes are:
- S Standard (20.00%)
- R Reduced Rate (5.00%)
- Z Zero Rated (0.00%)
Once you have entered all the SOR details select Save Changes to add them to the catalogue. Alternatively, you can clear the details you have entered by selecting Reset.
Note: If you are creating more than 100 SORs, please contact Propeller and these will be uploaded for you. To send the SORs email support@teampropeller.co.uk or submitt a ticket. Please send them in an Excel spreadsheet following the above headers and their requirements.
_____________________________________________________________________________________________________________________________________
Edit SORs

Select the pen icon to the right of the page.

Here you will be able to make changes to the SORs in the same format as creating them. At anytime you can undo your changes by selecting Reset. Once you have made the desired changes, select Save Changes.
You are also able to filter the list of SORs if you need to edit specific items.
_____________________________________________________________________________________________________________________________________
Filter SORs
Whilst in the editing view, select the Filter button.
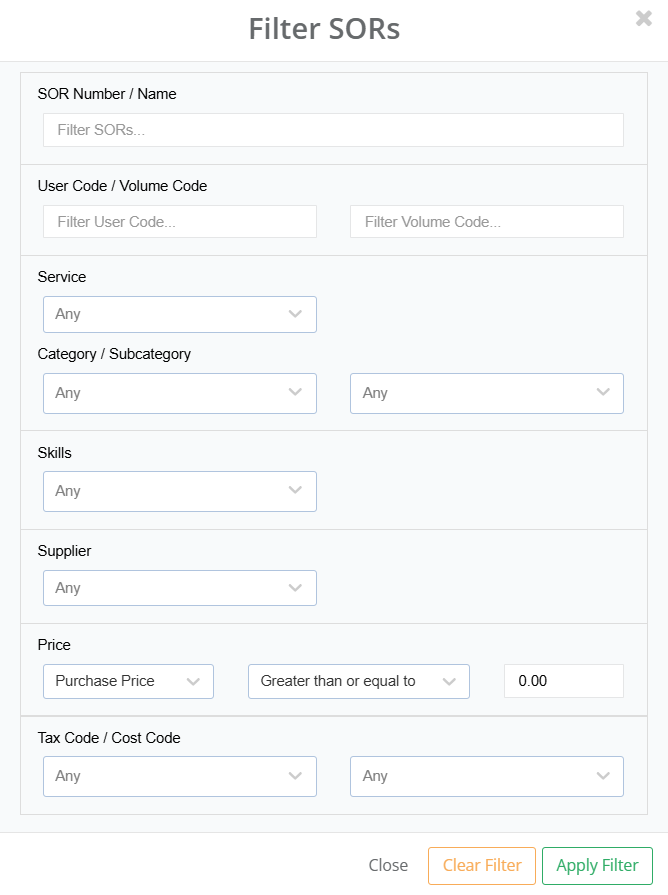
Once the desired filters have been selected, click Apply Filter.
_____________________________________________________________________________________________________________________________________
Delete SORs
In the editing view, select the SORs you would like remove and click Delete Selected. You can select SORs by clicking the row number.

Deleted SORs are not fully removed by the system and can be restored.
_____________________________________________________________________________________________________________________________________
Restore SORs
Similar to filtering/deleting SORs, go to the editing view of the SOR page. Here you can select the toggle to Show Deleted SORs.

Now you can select the SORs you would like to restore. Once this has been done, click Restore Selected.
_____________________________________________________________________________________________________________________________________
Export SOR List

Click the workbook icon to export a list of the SORs on your system.
_____________________________________________________________________________________________________________________________________
Apply SORs
You can add SORs when creating a visit. This is done in the final section where you can add the SOR to an Invoice, Material List, Purchase Order or Quote. please be advised that scheduling restrictions will only apply if the SOR is assigned to an Invoice.
To do this, search for the SOR Code or Name in section that you would like to apply the SOR to.
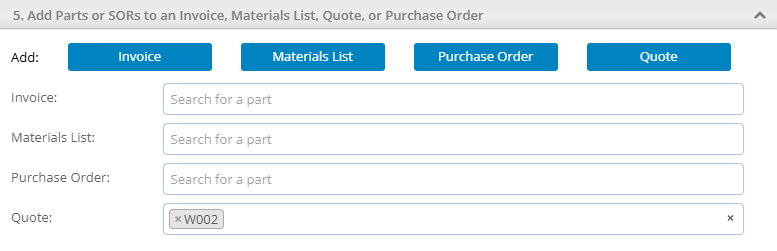
Note: If you are adding multiple SORs an engineer must meet all the skill requirements for each one.
Was this article helpful?
That’s Great!
Thank you for your feedback
Sorry! We couldn't be helpful
Thank you for your feedback
Feedback sent
We appreciate your effort and will try to fix the article